Level editor
Contents

Gamepad buttons Nintendo Switch
L STICK - (or R STICK if you inverted the stick control in settings) move the cursor around
A - select things under cursor - as if a LMB (left mouse button) was clicked
B - deselect current tool - as if RMB (right mouse button) or ESC was clicked
Y - start moving objects with a cursor. Only works if a single object is selected in level view.
X - delete selected object. Only works if an object (or multiple objects) is selected in level view.
L BUTTON / R BUTTON - switch tabs right and left
ZL BUTTON - undo
ZR BUTTON - redo
DIRECTIONAL BUTTONS - move the selected object (or objects) up, down, left or right by one grid
LEFT STICK BUTTON (or RIGHT STICK BUTTON if controls are inverted) - quick jump the cursor between the level view and the toolbox on the right
MINUS - quicksave
R STICK - (or L STICK if you inverted the stick control in settings) scroll contents when the cursor is hovered over a scrollable area

Gamepad buttons Xbox
L - (or R if you inverted the stick control in settings) move the cursor around
A - select things under cursor - as if a LMB (left mouse button) was clicked
B - deselect current tool - as if RMB (right mouse button) or ESC was clicked
X - start moving objects with a cursor. Only works if a single object is selected in level view.
Y - delete selected object. Only works if an object (or multiple objects) is selected in level view.
LB / RB - switch tabs right and left
LT - undo
RT - redo
DPAD ARROWS - move the selected object (or objects) up, down, left or right by one grid
LSB (or RSB if controls are inverted) - quick jump the cursor between the level view and the toolbox on the right
MENU - quicksave
R - (or L if you inverted the stick control in settings) scroll contents when the cursor is hovered over a scrollable area

Gamepad buttons Playstation
L - (or R if you inverted the stick control in settings) move the cursor around
X - select things under cursor - as if a LMB (left mouse button) was clicked
◯ - deselect current tool - as if RMB (right mouse button) or ESC was clicked
◻ - start moving objects with a cursor. Only works if a single object is selected in level view.
ꕔ - delete selected object. Only works if an object (or multiple objects) is selected in level view.
L1 / R1 - switch tabs right and left
L2 - undo
R2 - redo
DIRECTIONAL BUTTONS - move the selected object (or objects) up, down, left or right by one grid
L3 (or R3 if controls are inverted) - quick jump the cursor between the level view and the toolbox on the right
OPTIONS - quicksave
R - (or L if you inverted the stick control in settings) scroll contents when the cursor is hovered over a scrollable area
Using the level editor with a gamepad
You can create your levels with a gamepad.
To adjust the settings open the Level Editor Settings popup using the settings icon in the top-right corner. There you can adjust the speed of the cursor or invert right and left stick control using the "Move cursor with right stick" option.
First Steps
Use the Level Files Window in the bottom-left corner to create, open, save and manage your levels.
Select “New” to create a new level.

On the PC version of the game you can also use shortcuts to perform many actions - hove over a button to see its shortcut.

Set a file name and cuisine (the cuisine is the only thing you’ll not be able to change later).
All features of your level are divided into tabs (top of the screen).
When using gamepad quickly switch between tabs using the LB / RB buttons (Xbox), L1 / R1 (Playstation) or L BUTTON / R BUTTON (Nintendo Switch)
First go to the Basics tab

Set some basic settings for your level. You will also be able to change most of these at a later time.
Level Title: Set a name for your level. It will be shown at the start of the level when it is launched (and on the level list if you decide to share your level with the community). Please be respectful - profanities are strictly forbidden as this is a child-friendly game.
Level Creator: Who created your level. This can be your nickname or name. It will be shown at the start of the level when it is launched (and in the details screen if you decide to share your level with the community). Please be respectful - profanities are strictly forbidden as this is a child-friendly game.
No. of Players: The number of players your level supports
Gameplay Type: Pick if your level is co-op or battle
Time Difficulty: Controls how much time the player(s) will have to complete the dishes. 100 is the default setting and should be OK for most levels.
Grid Size: Set the grid size of your level
Pierogi Maker (Bowl in Japan): Choose if pierogi maker (or bowl in Japan) will require 2-player operation in your level
Ambience Color: Choose the default ambience color of the level
Tags: Pick tags describing your level. Use up to 5 tags. Click on tag in a popup to add or remove it. If you share your level, the tags will be used by other players to find your levels.

Building your level
Move through the tabs to add items and features to your level.
Floors
Floors are the basic building blocks of your level. Without them, you won’t be able to place any walls, kitchen utensils, or player spawn points. Floors should be used in every level, but don’t have to cover the entire area.
Pick a floor type from the toolbox (bottom right corner) and drag a rectangle in the level view to draw your floor.
You can change the X and Y size of a floor in the Selected Window (right of the level view).
Floors will be layered in the order you draw them. You can draw multiple floor rectangles on top of each other to achieve some interesting effects.

Walls
Walls prevent chefs from moving through or throwing through them. They can also hold some nice decorations.
On PC you can use two neat shortcuts when working with walls (or many other objects):
● Hold Shift before clicking to place a whole column of walls,
● Hold Ctrl before clicking to place a whole row of walls.
Counters
Counters provide support for many ingredients, appliances, and decorations. They also prevent chefs from moving through (without blocking their food throws).
Use the Filters Window to filter the counters in the toolbox by their X or Y (or both). This works for other tabs as well but is especially useful for the counters.

Counters come in many visual variants (depending on the cuisine of your level). Click “Change” next to the variant number to see available variants.

The X and Y size buttons are very useful to change a counter’s size (instead of replacing it which would be tedious).

Main
The most important elements of your level will be found in the “Main” tab. Hover over an item in the Toolbox to see its description.
The “Serving” section contains serving targets. At least one serving target is required in your level but you can add as many as you wish.
The “Processing” section contains kitchen appliances.
After selecting an appliance you can set its Tier (upgrade). “As purchased” means the appliance will be spawned using the upgrade that the player has purchased. All the other settings will force the appliance to be spawned in a fixed tier regardless of players’ purchases.
The “Ingredients” section contains the ingredient stack. Some of them must be placed on a counter and some must be placed on the floor (see a small icon in the bottom-right corner of a toolbox button).
The “Trays” and “Trash” sections contain… trays and trash cans. Placing them is not mandatory, but your level will not feel complete without them.
Advanced
The advanced tab contains elements of your level that can be switched on or off during gameplay and affect the level in various ways. Hover over any item to see its description.
Activation and deactivation of these elements is set using the “Activation” setting and the Circuits System (see below).
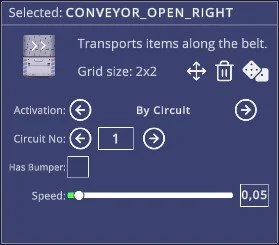
Conveyors transport items along the conveyor belt. Change the speed of a conveyor with the slider. Turn on the “Has Bumper” feature on a conveyor if you want it to stop the food at the end (otherwise the food will drop onto the floor).

Area Effects are effects (usually placed on the floor) that affect chefs’ movement.
Lamps provide a way to light up a small portion of your level. You can set the color and intensity of a light point. You will not be able to see the effect of a light source unless you change the Ambience Color (Basics Tab) of your level to something other than “White”.
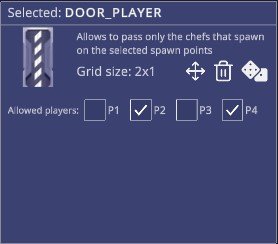
Doors can be placed on walls to prevent or slow down chefs’ movement. Automatic Door will always work and open when approached by any chef. Player Door works in a similar way, but it will only let through the chefs that were spawned on spawn points that you set (eg. spawn points 2 and 4 in the screen below).
Manual Door will only open if the circuit it's connected to is turned ON (eg. via a switch or virtual timer switch).
Switches and Logic provide a way to govern the ON /OFF states of circuits (see the Circuit System below).
Decors
Decors are used to make your levels look more appealing and interesting. They have no effect on the gameplay, but some of them can block movements. Hover over a decor to see its size. Some decors must be placed on counters, some on walls, and some on floors (see the small icon in the bottom-right corner of the toolbox button).
Many decors also come with graphical variants. To see all the decors at your disposal uncheck the “Group Variants” toggle (top-right corner of the Toolbox).
Light Areas
Light Areas provide a way to illuminate parts of your level.
Select the light, then click and drag to illuminate the selected area. As with point lights (Advanced Tab) you can set the color and intensity of the light area. You can also use the Circuit System to switch a light area on or off (eg. light up a room when a door leading to it was open).
Since Let’s Cook Together 2 is a 2D game, the lights also work in 2D space. This means they will not light up a room in your level but rather an area of the screen. Don’t worry if this is difficult to understand at first, we are 3D creatures after all.
Orders
In this tab, you set which dishes will have to be served to complete your level.
You can add as many orders as you like (but 10 orders is usually a good maximum).
Click on one or more small + buttons and pick a dish from a popup list to select for these slots. You can search the list for dish names.

Click the “Generate random orders” button to open the orders generator popup. Set the number of orders, and the number of 1/2/3-dish orders you want in your level. Select which dishes should be in your menu and click “GENERATE”. If you don’t like the outcome, click “GENERATE” again and again.

Chefs
In this tab, you set where the players’ chefs will be spawned in your level.
You can place the spawn points manually or click “Auto-Place” to place the spawn points automatically.
Click “Move” to move a spawn point around.
If your level is a 2 vs 2 battle, spawn points 1 and 3 will play in one team, and spawn points 2 and 4 will play in another team.
If your level’s Gameplay Type (Basics Tab) is BATTLE and your level supports 4 players, you’ll be able to select if the level is free-for-all or doubles (2 vs 2) - check the “4 players play in doubles” toggle in the Basics Tab.
See the NOTE in the Chefs Tab for more spawn points rules.
Circuits System (Advanced)
The Circuits System provides a very flexible system to govern how Switchable Elements of your levels are turned on or off.
Switchable Elements include most objects in the Advanced Tab and Light Areas. These elements will have an “Activation” setting. “Always On” and “Always Off” options are pretty self-explanatory so we will focus on the third option “By Circuit”.
Circuits are invisible wires that connect Switchable Elements with Switches (and Logic Gates). A circuit is defined by a number (Circuit No). To better understand it, imagine Circuit 1 means blue wire, Circuit 2 means red wire, Circuit 3 means green wire, and so on.
You can have infinite different circuit numbers in your level but usually only really need a few.
A circuit (wire) can be in one of two states: ON or OFF. An infinite number of Switchable Elements can be connected to a single circuit.
This is also true for Switches: they are either ON or OFF and many switches can be connected to a single circuit (but most of the time you will want a switch to be connected to only one circuit).
Switches change the state of their connected circuit. Hover over a switch to see how it works.


In the two images above you can see a very simple system. A manual door and a switch are both connected to the same circuit (1). In gameplay, the chefs could use this switch to open or close the door. If we were to add 5 more doorways on the same circuit, this switch would govern the state of all of these doors.
If you want something within your level to switch on or off automatically and in intervals use the Virtual Switch Timer. This switch will not be visible or intractable during gameplay but it will change the state of its connected circuit indefinitely.

In the example above the door will be closed for 5 seconds initially, then open for 10 seconds, then closed for 20 seconds, then open for 10 seconds, then closed for 20 seconds, and so on. The initial 5-second timer will start when all the players set they are ready as set in the “Start when” field.
Logic Gates are special invisible devices which change the way a state of a circuit behaves. Hover over a logic gate in the Toolbox to see what it does.
A logic gate will always be connected to one output circuit and one or two input circuits.
Let’s say you want a door in your level to open only when two floor switches are stood on. In this scenario, two chefs must stand in place for the third chef to be able to go through the door. In such a case it’s best to use an AND Logic Gate. The two floor switches would be connected to the logic gate as inputs (circuit 1 and 2 in the image below) and the door would be connected to the output of the logic gate (circuit 3).

With the logic gates set up, you can program virtually any level scenario. Play around with the circuit system and the logic gates to familiarize yourself with the possibilities they offer.
It’s important not to connect the output of a logic gate (or a set of logic gates) to its input. This would create an endless loop and literally freeze your game. To prevent that from happening the Level Editor issues an ERROR and forbids you to play such a level and points to the logic gates that have faulty settings.
Playing your level
Use the Play button (top-right corner) to test your level. It’s essential to test your level before you share it with others.
Use the Level Editor Settings button to adjust play options: coop / batte mode and chaos effects.

Warnings and Errors
ERROR messages will appear at the bottom of the Level Editor if you make a game-breaking mistake while designing your level. In order to play the level, you need to eliminate all errors first. Each ERROR message has a description informing you of the steps you need to take in order to eliminate that error.
WARNING messages provide guidance but your level is still playable (and shareable) if it has warnings.
Tips & Common Mistakes
● In most tabs you can select multiple objects in your level by drawing a selection rectangle in the Level View. This way you will be able to delete, move or edit the objects properties en masse.
● You move the selected object by one grid using the KEYBOARD ARROWS (PC), DPAD ARROWS (Xbox), DIRECTIONAL BUTTONS (Playstation or Switch)
● Undo and Redo buttons (and shortcuts) are your friends - use them often.
● It’s much easier to change the size of an existing counter or floor than to delete and replace them
● Always place your appliances or ingredients near the north edge of a counter. If you place such an element one grid down on a counter it will no longer be accessible by the chefs from the north even though it will look like it should be - that’s not a good user experience.
BAD
GOOD


Sharing
Once you have created, tested, and perfected your level, you might want to share it with the community.
Sharing your level is only available in the full version of the game.
Ensure you have provided a title and creator name and add a few Tags in the Basics Tab. Please be nice in the title and creator fields - profanity or otherwise offensive language will get your level banned and might potentially block you from sharing any other level in the future.
Go to the Share Tab, generate a preview, accept the EULA, and click “START UPLOAD”. That’s it - within a few minutes, your level should be playable by other players.
If you notice something you want to correct after you upload your level - don’t worry. You can always modify your level. However, keep in mind that this will reset your level’s public stats (likes and completions).